Monday 2 March 2015

IT WORKS

Only a week off schedule I had a go at running the pulsejet.
I wasn't particularly optimistic as people have said it's difficult to start in the first place and I was worrying that the fuel rod may not be able to deliver enough fuel fast enough.
However I was wrong.
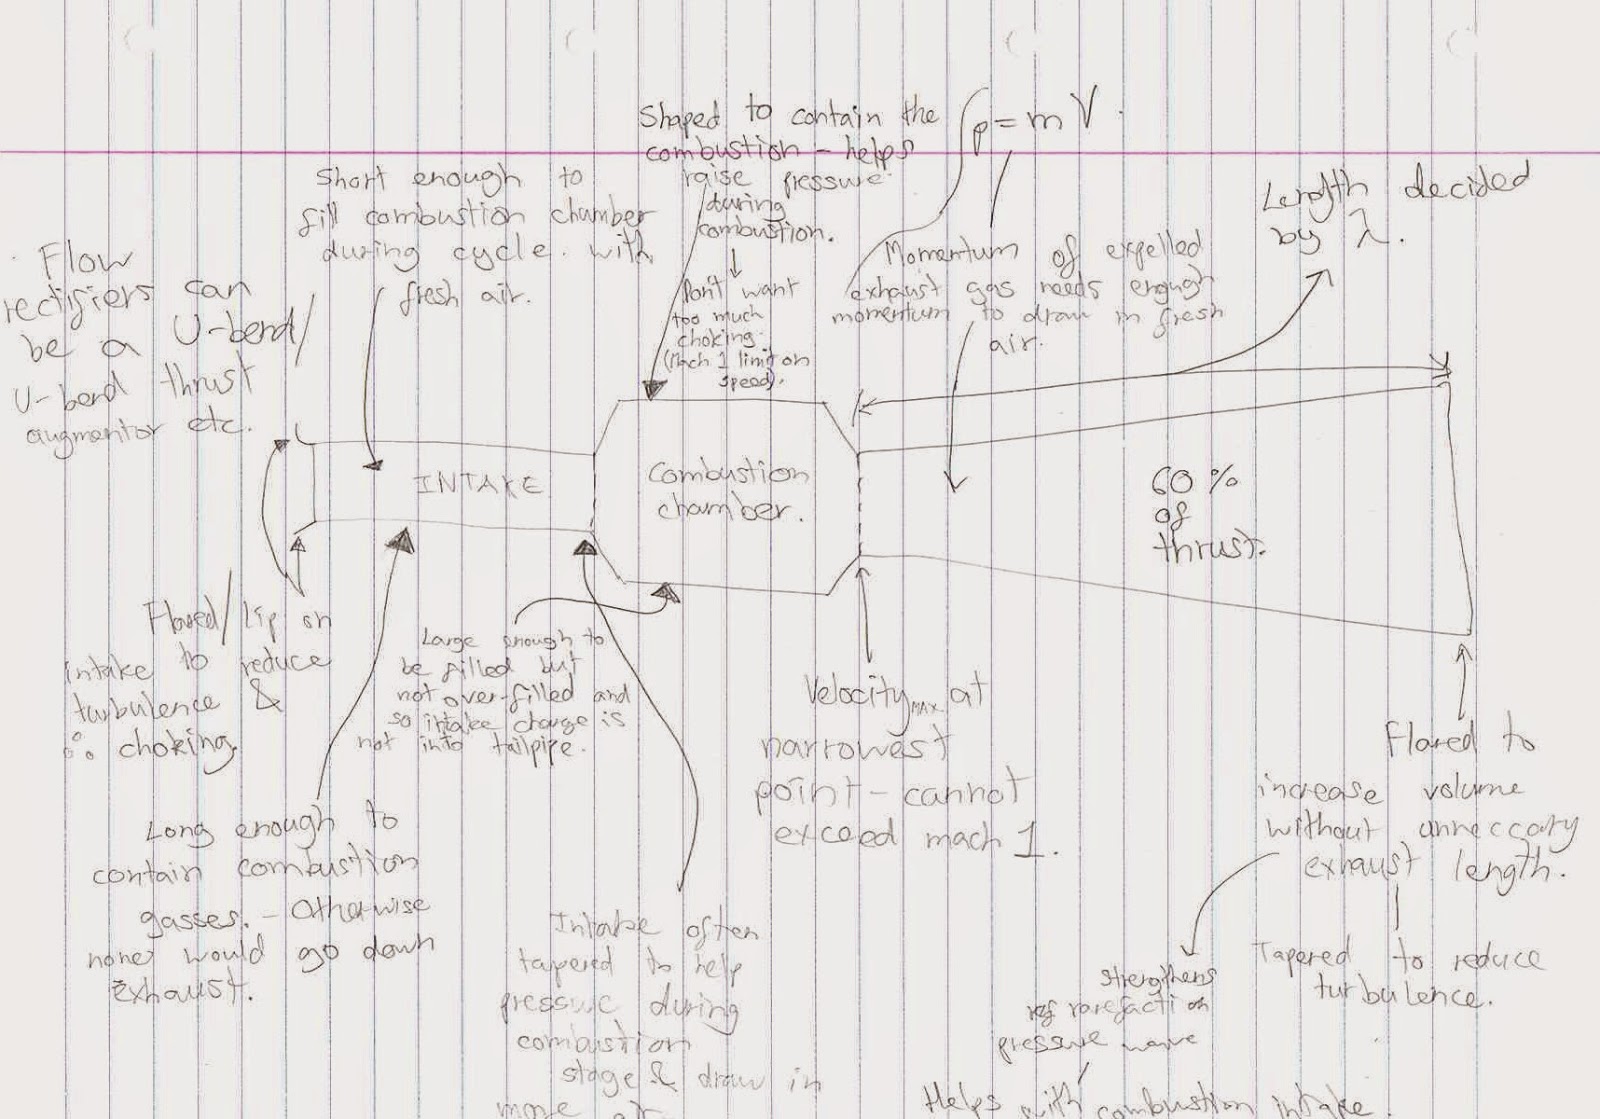
It started ridiculously easily using compressor-different to the usual use of a leaf blower.

I was also worried the it would just melt out due to thickness of mild steel but fortunatly we didn't run it long enough to see that happen. It did start burning the wooden pallet and glowed red hot though.

My Dad was controlling the gas flow with the cylinder regulator from a distance whilst I started it (typical). The gas regulator acted as a throttle replacing the need for valves like other models I have seen use.


It was quite loud (although not as loud/deafening as I'd expected-ear protection wasn't really needed). It also shook the ground and I even saw a neighbour across the road open a window to find out what the noise was. This would've been made worse if we'd have run it up to full throttle-we only went up to about half in this run.

The steps from here that I would like to take are:
To test the thrust produced
Run it at full throttle and possibly at night to see it glowing red hot
Attatch to a go-cart for a laugh.
Make a 'turbocharger' jet engine or another pulsejet-possibly valved?

Sunday 1 March 2015

FINISHED WEDLING

Finished welding all of the pieces together and fitted the fuel rod. I also made a stand for it using some steel angle to avoid it scorching the ground-I was careful not to restrict the engine too much as Bruce Simpson mentions how one of his Pulse-jets crumpled because he had rigidly mounted it and not allowed for the thermal expansion of the metal.
Just need to connect the gas bottle and get some decent weather to test it in.

Sunday 22 February 2015

FUEL ROD BUILD

I drilled the holes in the fuel rod and welded the end up. I decided not to use the ball valve to regulate the gas flow as we can just use the gas cylinder regulator.


Saturday 21 February 2015

TACKED TOGETHER

I grinded a few parts of the straight seems down and re-welded them slightly better. I intended to get all the circumferences welded today completing the main body of the Pulsejet ready for filling the fuel rod to and setting up.
However, the weather was terrible.. I've said in my risk assessments that any substantial amounts of welding I intended to do should be done outside to minimise fire risk and improve ventilation. Wind also makes welding more difficult because it blows away the shield gas making the welds of worser quality. This meant I couldn't do much more than tack the pieces together. This has made me miss the deadline date set for completion of my artefact. However, I intend to get it finished next weekend and in evenings instead. This shouldn't postpone the project and EPQ by too much and I therefore believe this isn't a huge problem.

These are the pieces tacked together:

Thursday 19 February 2015

FUEL ROD DESIGN 2

I've sourced a piece of hydraulic tubing that would be better suited as a fuel rod having a smaller diameter and thickness therefore impeding the gas flow less.


Here is the original design and the updated one:


Sunday 15 February 2015

STRAIGHT SEAM WELDS

I got all of the straight seams welded today (still on schedule). There are a few strips where the welds could be better so I'm thinking about whether it's worth grinding them down and redoing.

From reading that the surface of the metal has a large effect on weld quality, I looked at different ways of cleaning the metal in preparation for welding:
Sand-paper


Brush


Disk Grinder


I chose to use disk grinder as it cleaned the metal quickly and well:


I also found that parts where the metal joint had a gap didn't weld as well as when they were butted up tight.

Sunday 8 February 2015

FINISHED CONES

Managed to get all the cone rolling done today today just about on schedule.


To cut the inside radius for the combustion chamber flare 2, it was difficult to cut such a tight radius neatly using an angle grinder so I tried cutting it out using a hole saw on the advice of my dad but this wouldn't cut through the metal so ended up cutting a rough radius slightly smaller than the desired one and I can just flatten the top of the cone once rolled with a belt sander or something to give the desired diameter.


On the longer pieces such as the combustion chamber and tailpipes which I had my worries about being able to roll into a cone, to twist the metal in the rollers to ensure a cone is rolled, we slackened the rollers, twisted them, re-tightened them, and then rolled a bit more.
A fair amount of brute force was needed to marry the edges up.


All of the pieces are now tacked in shape; they just need the seams welding up and then all welding together and it'll be ready for fitting the fuel rod to.

Sunday 1 February 2015

CONE TRIAL 2

I looked at the option of adding a bracket guide to the metal roller but there seemed nowhere to mount it so that idea needs more thought. The man in the video also tightens one side of the top roller more than the other to achieve a tighter radius at one end of the metal.
I tried rolling the intake tube-the convergence on this cone isn't very great and it's very close to a standard tube-This was fortunate because of the length of the metal, there was a large amount in contact with the rollers making it very hard to twist straight to form the cone in the rollers. This wasn't too much of a problem because the difference could be corrected using brute strength and tacking the cone closed before putting it in the roller again to neaten it out.
This has worried me for rolling the exhaust pieces though as they are the longest pieces and have a greater convergence so will be difficult to make into a cone.
 The guide idea may need revisiting to help with this.
This piece also married up well to the intake flare (first test piece) which is positive sign. 

CONE TRIAL

I cut out the intake flare from the mild steel using an angle grinder; this seemed to work well enough even though it has a relatively tight inside radius. I also tried with tin snips but found this distorted the metal too much and was hard work. To roll the metal I put it in the roller and whilst rolling had my dad to keep the metal perpendicular to the roller.

The cone's dimensions are close enough to the desired measurements to make it feasible. The cone is slightly off-round in parts but with the metal being thin this can be altered by hand and welded in place. This cone looks reasonable enough to use on the actual pulsejet so i'm going to keep it; if the preceding cones are a similar sort of quality then I can use this, if they are better I can re-make it. 

When it was almost fully rolled I welded the come up so the edges met up well and put it back in the roller to improve it's shape. 


Also, if any of the cones have a tighter radius to cut, I can cut it roughly and once the cone is rolled sand down the top horizontally. 

The whole 2 person rolling job seemed quite a task so I looked on YouTube for tutorials and found one person who uses a guide clamped to the roller to turn the metal; I'm going to try this on the next cone. 

Friday 30 January 2015

FUEL ROD DESIGN

I've found some steel tubing in my dad's shed which I will be able to use for the fuel rod-This has a 16mm diameter and is 2mm thick.
I've decided i'm going to mount this at the end of the intake tube. This is for two reasons; the tube isn't stainless steel and taking Bruce Simpson's advice that this position is much cooler compared to nearer the combustion chamber-with this not being stainless steel this will help avoid it melting; and also as it will be easier to fit in this position-not working with a slanted face.
I'm going to drill 3mm holes along the tube.


I have also got a ball valve and gas tube adapter ready to build the fuel system and a gas cylinder regulator that allows the gas pressure leaving the cylinder to be increased from the standard 300 millibars to 4 bars; this flow will be necessary for proper functioning. I'm going to consult my dad about what fittings will be suitable and available for connecting this all together as his experience holds valuable information.

My worries at this stage is that the fuel rod being the size/thickness it is, it may impede the air flow in the intake sufficiently to prevent the Pulsejet from functioning properly. I'm going to have a look around to see if I can find something more suitable but if not will just try with the current fuel rod. The only way to find out if this has an effect is through testing. With the way I a planning on fitting the fuel rod though, it will be relatively easy to remove and replace with a different one if it causes a problem.

PAPER MOCKUP

I found when trying to print the templates that they were bigger than A3 which is the limit of my printer; I tried finding a way of tiling together A3 sheets to make a larger template but AutoCAD makes this very difficult to do. Instead I took the files to Staples in PDF form for them to print to scale on A1 for like £2 a sheet.
I thought that just to verify my templates and give me an idea of what sort of size the engine will be, I made a paper mock-up of the using the actual templates:


This confirms the templates fit together; I will need to do a test run on the actual sheet metal to ensure they still work including the thickness of the metal; if not I will need to remake some suitable templates and re-test them; this is shown on yellow on the schedule. 

Thursday 29 January 2015

SAFETY

From a safety point of view with me being 17 and this being a school project, I was advised by my supervisor to conduct a risk assessment. It basically outlines my dad supervising me throughout construction etc. and using the necessary PPE like welding masks, gloves ETC.

In terms of whilst actually running the Pulsejet, I'm going to have ear protection to hand as with the jet being an acoustic resonator, it can be very loud. I fire extinguisher will also be close to hand just in case.
Bruce Simpson has said that the engine actually has more chance imploding/crumpling more than exploding so a shield won't be needed. I will keep the area facing the exhaust clear in case any hot metal particles are spat out. I will also keep the control board for the fuel and the gas canister as far away from the engine as possible so once it is started everyone can retreat and control it from a 'safe' distance. If I feel extra precaution is needed I could possibly approach the science department in school and borrow a perspex shield I've seen used to protect students during experiments/demonstrations but I don't feel this will be necessary.

FUEL ROD

From looking at the dates I'm surrounding my schedule on, I have found that I have paid little attention to how I will make the fuel rod; due to the timings of when school closes for half term, if I want to use any of the schools resources (ie. pillar drill) I will need to have it made by the 13th of Feb; I need to decide this imminently.
From a quick look at what other people have done the fuel rod is basically metal pipe with holes drilled in to disperse the fuel-Bruce Simpson tells to use a steel tube with roughly 8mm diameter with 1.5-2mm holes drilled in along it facing the walls of the tube (1.12). He suggests two places to mount it: the end of the intake tube or the cone connecting the intake to the combustion chamber. Colin Furze uses this system; a 15mm diameter tube with 3mm holes punched in along which he mounts at the beginning of the combustion chamber.

SCHEDULE

Having been given a deadline to aim for to complete my artefact by (24th February), I have realised how pushed for time I am and see it fit to create the schedule I mentioned to try and aim for: an ambitious one at that.

Up until now I have had limited progress due to other commitments and a reluctance on my behalf to progress without a proper direction from school in fear of not fulfilling the EPQ requirements.
Looking at what days I can allocate to this project every week I have picked these dates to get certain parts finished by. I am assuming I can complete all the logging of the project and the paperwork in my spare time whilst at school and in the evenings; I won't plan for this time as I hope to just complete it as and when it needs doing.

This is the schedule I'm going to try and follow for February when basically the whole thing will have to be built. 
I am currently restricted to being able to weld on Sundays due to the time involved with setting up the welder/equipment, being supervised, the evenings going dark relatively early and working on Saturdays-this shouldn't be such an issue in the half term.


Sunday 25 January 2015

THEORY

Although I have decided not to pursue the true designing of my pulsejet, I have studied the relevant fluid dynamics and thermodynamics to further my own personal understanding and knowledge of how they function. This will also allow me to possibly verify the design I'm using against some of the simple mathematics and rules of thumb that have been developed.

The further reading I have undertook include 'Heat Engines' F.Metcalfe and various online information about the ideal gas law, Avagrado's hypothesis etc.

This will also hopefully be useful for the EPQ presentation to help me provide me a better basic scientific grounding of their functioning to explain.

Here's some compiled notes from The Enthusiasts Guide (1) showing how some of the dimensions are related and why they need to be:


Sunday 18 January 2015

WELDING PRACTICE 2

I've looked at some youtube welding tutorials and found how important the welder settings are so i'm going to have an experiment with different wire feeds.


After another welding practise, welding seems to already be adequate so I don't think there will be any issues there.


There and no beads that need grinding down like last time  to eliminate the thermal expansion problem and the inside of the weld has much better penetration so it stronger and smoother (roughness would create turbulence and reduce performance). They are good enough for the purpose of this.

Note to self:
Metal gets hot after welding so WEAR GLOVES-thumb is v. sore rn

Sunday 21 December 2014

CONE TEMPLATES

To make the cone templates, I can use knowledge learnt from my study of maths to make a shape that effectively looks like a pizza slice with a bite out of it with corresponding radius' to the ones on my design.
I had to re-do one of the templates for the long exhaust length. It is 1058mm long and I didn't think to consider the limit on size imposed by the length of the sheet metal roller. By looking at a picture of Bruce Simpson's and his Pulsejet, I can see that his has a weld halfway up the exhaust where it has been made in two parts; I will overcome the problem with this same solution; by spitting the cone to be rolled in two halves. Although this will create more to weld.

I have thought about the way I can make the templates and I reckon I can just print the templates onto paper; this is much easier than drawing out full size templates through geometrical methods.  To do this I need to digitalise the designs I have worked out; the choice of software to do this is Google Sketchup and AutoCAD; being relatively familiar with both, I know it will be easier to print and work to a 1:1 scale from AutoCAD so that is what I will use. My printer prints in A3 so printing shouldn't be an issue.

I had originally done all the calculations by hand which has turned out to be a waste of time when I could've just done them on the computer to start with. I suppose they gave me something to double check the templates against so they are definitely right.


From reading Bruce Simpson's work on building a jet engine, I have found that he used a plasma cutter to cut out his metal pieces. I still believe my idea of using an angle grinder will be fine for the larger radius', but I may have problems with the tighter radius'; I may look into the possibility of using a smaller cutting disk; if these do not exist I may need to look at sourcing a plasma cutter. 

Wednesday 10 December 2014

FINAL DESIGN

The 90deg bends and tube arrived:


By comparing the diameter of the 90deg bends I have sourced with those used in Bruce Simpson's design, I have calculated a scale factor of 73.1/76 (ratios of inside diameters) that each measurement can be multiplied by to create the design I am going to follow. Effectively mine is slightly smaller than the original design.

I imputed Bruce Simpson's design into AutoCAD and applied the scale factor; this is easier than doing all the calculations by hand and also provides me with a digital copy of the design.

(3)
From using the dimensions describing the 90.deg bends in the table above provided by the manufacturer and comparing it to Bruce Simpson's design, the difference in U-bend length is (73.1/76 *190pi/2 - 160pi/2 =) 35.7mm. As the 90deg. bends have a small straight section at each end that will need cutting off, I can just leave 35.7mm on on of the bends to fill this gap.

Bruce Simpson's design:
(19)

Here is the design I will follow with labels showing how I refer to the pieces throughout this project:

Saturday 6 December 2014

FUEL, FUEL DELIVERY SYSTEM, IGNITION

As part of the Lockwood-Hiller I will need to choose a fuel for it to run on and how I will provide this to the pulsejet.

Pulsejets seem to run on virtually any fuel, 'if it burns, you can probably run a pulse jet on it' (8.1).

Although they can run on virtually anything, propane seems to be the best option for me; with it's boiling point being so low, it can be supplied straight as a gas-propane pulsejets are 'one of the easiest to start' (1.2). It is also easy for me to source in compressed cylinders and doesn't require any sort of vaporizer or pump. 

To supply the fuel most people seem to use what is called a fuel rod to do this but an alternative is injecting the fuel down the intake through to the combustion camber. I'm going to opt for the fuel rod method as it's the one that's most documented and therefore familiar; however it will require more work.  This shouldn't effect the rest of the design so won't restrict any progress.

I also need to decide how to ignite the fuel-Bruce Simpson outlines how to use a spark plug (1.1), however, Colin Furze just ignites the gas using a blowtorch at the intake. I think I'm just going to use this method to keep construction simple for the time being.
The fuel delivery system will also need designing; although Bruce Simpson recommends 2 valves: one for idle and one for full throttle/finer adjustments (1.11), I just want my pulsejet to run so am just going to use a single one. If it runs I can always alter the delivery system in retrospect to improve performance.

Thursday 4 December 2014

U-BEND

I've decided that the deciding factor on the scale of my pulsejet will be determined by the 180deg bend I can source as this will be the only part of fixed size.  The U-bend needs to be constructed from Mild steel to assist with welding and needs to be as close the thickness to the 1.2 mm sheet steal acquired from school to make welding simpler and the rate of thermal expansion similar for all parts making the engine last longer.

I've found a website called jetex.co.uk (18) which sells custom exhaust parts/manderal bends in mild steel in a thickness of 1.5mm (close enough to 1.3mm of the sheet metal) in a diameter (3inches) relatively close to the one used for Bruce Simpsons design. They sell a 180° bend that I could use for my pulsejet. However, this has a radius of 120mm-from quickly inputting this into google sketchup I found this to be too tight which would mean the intake and exhaust would be too close; this worried me due to heat dissipation; as pulsejets gets very hot whilst functioning good ventilation would be important to avoid the steel prematurely melting. I have therefore settled on two 90° bends they sell which I could then weld together creating a larger radius. From looking at the theory behind pulsejets, I've found that the relative dimensions are quite important due to the resonance theory of wavelengths, therefore to maintain the overall length of the bend, I can increase it with a straight tube section connecting them. I can also use this technique to create adequate spacing between the intake and exhaust if necessary and shorten the tubing between the combustion chamber and the U bend.

I'm also going to order a straight section of tube; to practise welding circumferences on and because the lockwood hiller design I'm following has a stretch of pipe the same thickness as the U-bend; this will save me rolling it.

Here is a diagram of how the pieces' sizes are supposedly meant to be related from the theory of resonance. Note 'supposedly'-no-one seems to 100% understand how these work.
(7.2)

Monday 1 December 2014

FRENCHGEEK

I've had another look at the blog Frenchgeek (follows a guy doing an almost identical project to mine). This account of first hand research should help me prevent any problems he faced before they occur.

Cause for concern:
This guy did a 22 week welding course before embarking on building his pulsejet; i have neither the time nor money to do this and really have no longer than around 3 weeks before I NEED to start building my jet.If worst comes to the worst I'll have to find someone else to weld for me although I would like to do it all myself.
I am going to need to create a schedule for the construction of my artefact not only to help manage my time efficiently but to help make decisions on whether I will need to source any extra help to finish on time.

Sunday 30 November 2014

POSSIBLE EXTRAS

Bruce Simpson's book describes some performance enhancing additions that can be added to a pulsejet to inprove performance such as a thrust augmentor; this has been claimed to boost thrust by up to 50%. A cooled air intake has also been mentioned; I will consider these with the design and could look at evaluating the actual gain of adding such systems onto a pulsejet.

Saturday 29 November 2014

COLIN FURZE

A youtube search has uncovered a guy called Collin Furze; a complete legend who has made a few pulsejet engines including a massive one. On his website www.colinfurze.com he gives the plans he used to build it-He uses a Lockwood-Hiller design which is just a scaled up version of Bruce Simpson's design. I've decided I am also going to use Bruce Simpson's design and scale it to meet the materials I can source.

Friday 28 November 2014

LOCKWOOD HILLER-CHOSEN DESIGN-NEXT STEPS

From further research around the Lockwood engine, I have found that Bruce Simpson has also published a guide for people wanting to build their own Lockwood Pulsejet (6).. this should be useful for general guidance.

I will look into the extra parts I will need for this design on top of the sheet metal I have and begin sourcing and getting a design sorted.

Thursday 27 November 2014

DESIGN COMPARISONS

To compare designs I have created a set of specifications for evaluating the suitability of each design;

Feasibility-Is it realistically possible for me to manufacture/construct this design with my limited knowledge and restricted access to tools/machinery.
Accessibility-Is there enough information and knowledge available to allow me to design/build one.
Price-Is the price of the materials needed for the design within reason for this project.-Ideally no more than £100?
Popularity-Is the design popular amongst hobbyists? If it isn't there'll be a reason for it.
Time-Is it realistically possible for me to manufacture/construct this design in the time-scale.

I have picked these as they matter to me the most for the case of this project; i could've done thrust, efficiency, weight stc. depending on the purpose of this pulsejet.
I am going to score each of these categories out of 10 to help decide which is the superior design for this project.
The comparison is given below:

The Lockwood-Hiller has come out with the highest score. Although I would have liked to design my own pulsejet, I have decided that there is a lack of information regarding the designing of this type. I am therefore going to investigate existing designs modified for my own purposes.

Sunday 23 November 2014

WELDING/METAL ROLLING ATTEMPT

As all of the designs I am considering involve the same mild steel construction and rolled sheet metal techniques, I began practising MIG welding.

Using my dad's angle grinder with a thin metal cutting disk in, it was fairly easy to cut rectangles out of the sheet metal. Using the sheet metal roller lowering the top roller by a half turn at a time, it was easy and simple to roll a tube which could be removed from the roller by detaching the top roller. I then (attempted to) MIG welded the gap to form a solid tube.
From looking at how roll cones cones/frustums (as opposed to tubes), the technique is the same; the shape of the material that is being rolled determines the shape of the cone. I will need to design nets and find a way of making these into full-size templates. I should be able to cut out these nets using an angle grinder again.


I originally tried welding with small strips. However I found this often burnt through the metal leaving a hole. I then started welding with small beads 'stitching' the weld.

From inspecting my welds, first hand comments from dad (who can weld and has had such jobs in the past) and research into what makes a good weld, I found that mine had poor penetration and protruding beads that needed grinding down; these mean the joint is relatively weak and basically, not good enough...I would like to construct the whole pulsejet myself so this will need work.

Thursday 20 November 2014

SHEET METAL SOURCING

All of the designs use the same mild steel construction from rolls sheet metal so even though I haven't decided on design I decided it would be appropriate and beneficial to start looking for suppliers of sheet metal. I've found many websites selling mild steel sheets which i will need. I approached the DT department in my school to see if they had any suppliers that I could possibly look at for sourcing these materials and acquired some names of suppliers they use-my thinking being they will be reputable and might have cheaper prices with them supplying to schools. However in doing so discovered that they had a collection of sheet mild steel at a suitable thickness (1.2mm) which was usable for my design and therefore purchased a few sheets at a brilliant price-regardless of whether I use these for the final product, they will be useful to practise techniques on nonetheless.


Monday 17 November 2014

MATERIALS/TECHNIQUES

From looking at various designs and recommendations in Bruce Simpson's book, I have found that all of the designs are made from either mild steel or stainless steel. As this will have an influence on how I make the pulse-jet, I will need to compare the two materials for suitability. I have decided to do this now because it will allow me to start practising my techniques such as metal rolling/welding which will need to be developed over time.

Mild Steel
Cheap
Easily welded
Rusts (oxidises easily)
Heavy

Stainless Steel
More aesthetically pleasing
Stronger/more durable
Lighter
More expensive
Has to be TIG welded (as opposed to MIG therefore more difficult)

I have decided to go with mild steel because although stainless performs better, price and workability are more important for this project.

My dad has a MIG welder that I can use to weld the pulsejet; I will need to experiment with the different feed settings and techniques for the type and thickness of the steel.
In terms of actually rolling the metal, my Dad has a set of slip rolls that I can learn to use also.

Monday 10 November 2014

THERMOJET

This is a valveless Pulsejet design very similar to the Chinese design except has two slightly shorter intake tubes going into the combustion chamber as opposed to just one.
Pulsejetengines.com says this is one of the best Pulsejet to build for the first time with it having 'the best range of performance characteristics and super easy starting'. (8.2)

(8)

LOCKWOOD HILLER

It turns out that this was the type of design actually used on scrapheap challenge.
A Lockwood-Hiller engine is a valveless pulsejet and consists of a combustion chamber, intake tube and exhaust pipe. The defining characteristic of this design is the U-bend in the exhaust making the intake and exhaust face the same direction.

It's easy to find the patent filed for the Lockwood engine in archives (17) which describes the design and a blog following a guy who made his own lockwood-hiller and documented the process (16).

If I choose a Lockwood-hiller I can be confident there is enough information from people who have already built their own to help with the construction of my own; the design seems to be well rated among enthusiasts, most common and most documented. However, with this type of design, there is a lack of standardised comprehensive mathematical laws governing their function and although backed by basic theory, many successful designs seem to be generated through empiricism due to the shear number of unpredictable variables involved with their function. (1.10)

(13)

CHINESE/FOCUSED WAVE PULSEJET

From what I can understand the Chinese and Focused-Wave designs are basically the same; the intake and exhaust face the same direction with the intake being a small tube directly leaving the combustion chamber.

I have found mixed reviews on this design; Bruce Simpson says it's poorly rated (1.6) whilst pulsejetengines.com rate them highly.

(8)

VALVED DESIGNS

When it comes to valved designs, the shape can be calculated using using calculations in Tharratts paper.

Valved engines have the benefit of a good power to weight ratio and are compact.
However they are more difficult to build (valves to manufacture).
(8.1)

The main factor that is to be chosen is the type of valve design to be used from:

Petal Valve-A thin piece of shaped metal attached to a plate with holes in. When the plate experiences a negative pressure (from the chamber after combustion), the metal 'petals' flex upwards exposing the holes underneath and allowing fresh air in. (1.3)


(12.1)


V-Valve-This is a valve similar to the petal valve but the valves are in a 'V' shape to provide a straighter root for the incoming air to travel down. These are: More efficient than petal valve, easier/cheaper to repair (valves can be replaced individually), easy to scale up or down by changing the number of valves, more complex/expensive than petal valves.(1.8)


This type of valve is very similar to the type used on the V1 bomb. (14)


A v-valve is also very similar to the reed valve on a 2-stroke engine:
(15)

Rotary Valve-A spinning plate on the front of the jet with holes that line up in sync with the engine cycle: Holes are created when the Pulsejet needs a 'breath' of air and are blocked when the gasses are combusting. (1.7)

The Enthusiasts Guide has also given me an insight into the mathematical work that has been performed on pulsejets (1.9); a large amount of work was done by Tharrat in his paper 'The Propulsive duct'. This is easy to find on online (12.2) and describes relationships between measurements and power output etc. This allows one to calculate the measurements of a pulsejet through the desired characteristics.
Fredrik Westberg also gives calculations that can be used to design a valved pulsejet with details such as valve area etc. (5.1)

For the purpose of deciding a design, I am going to treat all valved designs as one to evaluate against other designs.